Gradle插件开发,官方推荐的具备first class supprot 的IDE包括Android Studio和Intelij Idea等。
Gradle的编译流程分为三步build_lifecycle
Initialization -> Configuration -> Execution
执行的单位叫做Task
Gradle作为一个program,可以为编译环境设置的参数很多
Android dependency ‘com.android.support:support-v4’ has different version for the compile (21.0.3) and runtime (26.1.0) classpath. You should manually set the same version via DependencyResolution
一些常用的gradle的command 如下
gradlew :app:dependencies –configuration releaseCompileClasspath
//前面这个:app只是代表app这个project的
gradle tasks –all ## 查看当前project的所有tasks
gradle taskA taskB ##多个task是可以同时执行的
gradle –status ## 查看当前操作系统中还有那些Daemon可以用
afterEvaluate是属于project的属性(也可以在allProject中加)
I forced the version of support-v4 using this block in root build.gradle:
subprojects {
    project.configurations.all {
        resolutionStrategy.eachDependency { details ->
            if (details.requested.group == 'com.android.support'
                    && !details.requested.name.contains('multidex') ) {
                details.useVersion "$supportlib_version"
            }
        }
    }
}
All com.android.support libraries must use the exact same version [duplicate]
关于gradlew只是一层gradle的wrapper,找到这么一段话:
The Gradle Wrapper is the preferred way of starting a Gradle build. It consists of a batch script for Windows and a shell script for OS X and Linux. These scripts allow you to run a Gradle build without requiring that Gradle be installed on your system. This used to be something added to your build file, but it’s been folded into Gradle, so there is no longer any need. Instead, you simply use the following command.
$ gradle wrapper –gradle-version 2.13
./gradlew -v 版本号
./gradlew clean 清除app目录下的build文件夹
./gradlew build 检查依赖并编译打包
./gradlew assembleDebug 编译并打Debug包
./gradlew assembleRelease 编译并打Release的包
或者
./gradlew aR
./gradlew installRelease Release模式打包并安装
或者
./gradlew iR
./gradlew uninstallRelease 卸载Release模式包
Android项目迁移到gradle 3.0需要注意的一些事
- implementation和api的区别:
When your module configures an implementation dependency, it’s letting Gradle know that the module does not want to leak the dependency to other modules at compile time. That is, the dependency is available to other modules only at runtime.
Using this dependency configuration instead of api or compile can result in significant build time improvements because it reduces the amount of projects that the build system needs to recompile. For example, if an implementation dependency changes its API, Gradle recompiles only that dependency and the modules that directly depend on it. Most app and test modules should use this configuration.
// a module 使用implementation引入了某个dependency,这个依赖就不会暴露给依赖于a的mudule。
When a module includes an api dependency, it’s letting Gradle know that the module wants to transitively export that dependency to other modules, so that it’s available to them at both runtime and compile time. This configuration behaves just like compile (which is now deprecated), and you should typically use this only in library modules. That’s because, if an api dependency changes its external API, Gradle recompiles all modules that have access to that dependency at compile time. So, having a large number of api dependencies can significantly increase build times. Unless you want to expose a dependency’s API to a separate test module, app modules should instead use implementation dependencies.
//所以如果想要把自己的某项依赖暴露出去,让依赖自己的mudule也能用到这项依赖,就要用api了
但是api和之前的compile是一样的,所以编译速度比implementation慢很多。
看到一份关于android build tasks解释的非常好的文章
mergeDebugResources任务的作用是解压所有的aar包输出到app/build/intermediates/exploded-aar,并且把所有的资源文件合并到app/build/intermediates/res/merged/debug目录里

processDebugManifest任务是把所有aar包里的AndroidManifest.xml中的节点,合并到项目的AndroidManifest.xml中,并根据app/build.gradle中当前buildType的manifestPlaceholders配置内容替换manifest文件中的占位符,最后输出到app/build/intermediates/manifests/full/debug/AndroidManifest.xml

processDebugResources的作用
1、调用aapt生成项目和所有aar依赖的R.java,输出到app/build/generated/source/r/debug目录
3、生成资源索引文件app/build/intermediates/res/resources-debug.ap_
2、把符号表输出到app/build/intermediates/symbols/debug/R.txt

compileDebugJavaWithJavac这个任务是用来把java文件编译成class文件,输出的路径是app/build/intermediates/classes/debug
编译的输入目录有
- 1、项目源码目录,默认路径是app/src/main/java,可以通过sourceSets的dsl配置,允许有多个(打印project.android.sourceSets.main.java.srcDirs可以查看当前所有的源码路径,具体配置可以参考android-doc
- 2、app/build/generated/source/aidl
- 3、app/build/generated/source/buildConfig
- 4、app/build/generated/source/apt(继承javax.annotation.processing.AbstractProcessor做动态代码生成的一些库,输出在这个目录,具体可以参考Butterknife 和 Tinker)的代码

transformClassesWithJarMergingForDebug的作用是把compileDebugJavaWithJavac任务的输出app/build/intermediates/classes/debug,和app/build/intermediates/exploded-aar中所有的classes.jar和libs里的jar包作为输入,合并起来输出到app/build/intermediates/transforms/jarMerging/debug/jars/1/1f/combined.jar,我们在开发中依赖第三方库的时候有时候报duplicate entry:xxx 的错误,就是因为在合并的过程中在不同jar包里发现了相同路径的类

transformClassesWithMultidexlistForDebug这个任务花费的时间也很长将近8秒,它有两个作用
- 1、扫描项目的AndroidManifest.xml文件和分析类之间的依赖关系,计算出那些类必须放在第一个dex里面,最后把分析的结果写到app/build/intermediates/multi-dex/debug/maindexlist.txt文件里面
- 2、生成混淆配置项输出到app/build/intermediates/multi-dex/debug/manifest_keep.txt文件里

项目里的代码入口是manifest中application节点的属性android.name配置的继承自Application的类,在android5.0以前的版本系统只会加载一个dex(classes.dex),classes2.dex .......classesN.dex 一般是使用android.support.multidex.MultiDex加载的,所以如果入口的Application类不在classes.dex里5.0以下肯定会挂掉,另外当入口Application依赖的类不在classes.dex时初始化的时候也会因为类找不到而挂掉,还有如果混淆的时候类名变掉了也会因为对应不了而挂掉,综上所述就是这个任务的作用

transformClassesWithDexForDebug这个任务的作用是把包含所有class文件的jar包转换为dex,class文件越多转换的越慢
输入的jar包路径是app/build/intermediates/transforms/jarMerging/debug/jars/1/1f/combined.jar
输出dex的目录是build/intermediates/transforms/dex/debug/folders/1000/1f/main
app/build/intermediates/symbols/debug/R.txt这个文件长这样
int anim abc_fade_in 0x7f010000
int anim abc_fade_out 0x7f010001
int anim abc_grow_fade_in_from_bottom 0x7f010002
int anim abc_popup_enter 0x7f010003
int anim abc_popup_exit 0x7f010004
int anim abc_shrink_fade_out_from_bottom 0x7f010005
int anim abc_slide_in_bottom 0x7f010006
int anim abc_slide_in_top 0x7f010007
int anim abc_slide_out_bottom 0x7f010008
int anim abc_slide_out_top 0x7f010009
int anim design_bottom_sheet_slide_in 0x7f01000a
int anim design_bottom_sheet_slide_out 0x7f01000b
int anim design_snackbar_in 0x7f01000c
int anim design_snackbar_out 0x7f01000d
int anim tooltip_enter 0x7f01000e
int anim tooltip_exit 0x7f01000f
int animator design_appbar_state_list_animator 0x7f020000
int attr actionBarDivider 0x7f030000
int attr actionBarItemBackground 0x7f030001
int attr actionBarPopupTheme 0x7f030002
int attr actionBarSize 0x7f030003
…
按照字母从a-z开始,hex value自增(0x7f开头)
Android Studio中点击run之后,执行了这些tasks
Task spend time:
2ms :app:preBuild
64ms :app:preDebugBuild
9ms :app:compileDebugAidl
4ms :app:compileDebugRenderscript
1ms :app:checkDebugManifest
2ms :app:generateDebugBuildConfig
1ms :app:prepareLintJar
1ms :app:generateDebugResValues
0ms :app:generateDebugResources
57ms :app:mergeDebugResources
1ms :app:createDebugCompatibleScreenManifests
4ms :app:processDebugManifest
1ms :app:splitsDiscoveryTaskDebug
18ms :app:processDebugResources
1ms :app:generateDebugSources
11ms :app:javaPreCompileDebug
10ms :app:compileDebugJavaWithJavac
1ms :app:compileDebugNdk
0ms :app:compileDebugSources
4ms :app:mergeDebugShaders
1ms :app:compileDebugShaders
0ms :app:generateDebugAssets
8ms :app:mergeDebugAssets
19ms :app:transformClassesWithDexBuilderForDebug
6ms :app:transformDexArchiveWithExternalLibsDexMergerForDebug
7ms :app:transformDexArchiveWithDexMergerForDebug
1ms :app:mergeDebugJniLibFolders
12ms :app:transformNativeLibsWithMergeJniLibsForDebug
10ms :app:transformNativeLibsWithStripDebugSymbolForDebug
0ms :app:processDebugJavaRes
24ms :app:transformResourcesWithMergeJavaResForDebug
2ms :app:validateSigningDebug
7ms :app:packageDebug
0ms :app:assembleDebug
可以分成这5类吧
- Preparation of dependencies. During this phase Gradle check that all libraries this module depends on are ready. If this module depends on another one, that module would be built as well.
- Merging resources and processing Manifest. After this phase resources and Manifest are ready to be packaged in the result file.
- Compiling. This phase started with Annotation Processors, in case you use them. Then source code is compiled into byte code. If you are using AspectJ, weaving also happens here.
- Postprocessing. All Gradle tasks with a “transform” prefix are part of this phase. Most important ones are: transformClassesWithMultidexlist and transformClassesWithDex. They produce .DEX files.
- Packaging and publishing. For libraries this stage means creating an .AAR file in the end, for applications — .APK.
Gradle的Flavor能否配置sourceset?
在sourceSets中可以设置不同flavor各自的java.srcDirs和res.srcDirs
Product flavors
一个product flavor定义了从项目中构建了一个应用的自定义版本。一个单一的项目可以同时定义多个不同的flavor来改变应用的输出。
Build Type + Product Flavor = Build Variant(构建类型+定制产品=构建变种版本)
这句话的意思就是,BuildTypes有n种,product flavor有m种,最终可能的组合有m*n种
Gradle Plugin User Guide
gradle 4.4之后Clock 被Deprecated的方案是自己创建一个groovy文件
org.gradle.util.Clock() // 被Deprecated之后的解决方案
2. 创建java Library并提交到jcenter的方法
JFrog 是软件管理和分发的领先通用解决方案JFrog 是软件管理和分发的领先通用解决方案,JFrog Bintray(通用分发平台)只是他家的众多服务之一。这个通用分发平台,就当CDN用好了。
bintray的注册地址。注册好了之后登录bintray,创建一个仓库,随便起名字,比如叫maven。在build.gradle中就可以引入
maven { url ‘https://dl.bintray.com/yourusername/maven‘ }
compile ‘com.yourusername:librayName:1.0.0’
到这里,就可以自己直接使用了。要想提交到jcenter(就是说不用添加一个maven {url }这样的源),jcenter(托管在Bintray网站上的官方库,官方和普通的区别就是提交上去要审核)和mavenCentral也是仓库。只不过是有官方维护的了。因为maven的标准写法是
maven { url “https://someurl“ } //
maven { url “https://jitpack.io“ } // 比如说jitpack仓库
正儿八经的上传到jcenter的方式:
一.在最外层build.gradle中添加
classpath ‘com.github.dcendents:android-maven-gradle-plugin:1.3’ //
classpath ‘com.jfrog.bintray.gradle:gradle-bintray-plugin:1.6’
配好了大概长这样
// Top-level build file where you can add configuration options common to all sub-projects/modules.

buildscript {
    repositories {
        jcenter()
        google()
    }
    dependencies {
        classpath 'com.android.tools.build:gradle:3.0.1'

        classpath 'com.github.dcendents:android-maven-gradle-plugin:1.4.1'
        classpath 'com.jfrog.bintray.gradle:gradle-bintray-plugin:1.6'
        // NOTE: Do not place your application dependencies here; they belong
        // in the individual module build.gradle files
    }
}

allprojects {
    repositories {
        jcenter()
        google()
    }
}
android-maven-gradle-plugin插件是用来打包Maven所需文件的。
gradle-bintray-plugin插件是用来将生成的Maven所需文件上传到Bintray的。
二.在library module的build.gradle中添加
apply plugin: 'com.github.dcendents.android-maven'
apply plugin: 'com.jfrog.bintray'
// This is the library version used when deploying the artifact
version = "1.0.0"

def siteUrl = 'https://github.com/Haldir65/androidMedia'      // 项目的主页
def gitUrl = 'https://github.com/Haldir65/androidMedia.git'   // Git仓库的url
group = "com.github.haldir65.starry"                                        // Maven Group ID for the artifact,一般填你唯一的包名
install {
    repositories.mavenInstaller {
        // This generates POM.xml with proper parameters
        pom {
            project {
                packaging 'aar'
                // Add your description here
                name 'Starry\n' +
                        'Starry night\n' +
                        'Paint your palette blue and grey'
                url siteUrl
                // Set your license
                licenses {
                    license {
                        name 'The Apache Software License, Version 2.0'
                        url 'http://www.apache.org/licenses/LICENSE-2.0.txt'
                    }
                }
                developers {
                    developer {
                        id 'haldir'        //填写的一些基本信息
                        name 'johnDoe'
                        email 'mjw090608@gmail.com'
                    }
                }
                scm {
                    connection gitUrl
                    developerConnection gitUrl
                    url siteUrl
                }
            }
        }
    }
}
task sourcesJar(type: Jar) {
    from android.sourceSets.main.java.srcDirs
    classifier = 'sources'
}
task javadoc(type: Javadoc) {
    source = android.sourceSets.main.java.srcDirs
    classpath += project.files(android.getBootClasspath().join(File.pathSeparator))
}
task javadocJar(type: Jar, dependsOn: javadoc) {
    classifier = 'javadoc'
    from javadoc.destinationDir
}
artifacts {
    archives javadocJar
    archives sourcesJar
}
Properties properties = new Properties()
properties.load(project.rootProject.file('local.properties').newDataInputStream())
bintray {
    user = properties.getProperty("bintray.user")
    key = properties.getProperty("bintray.apikey")
    configurations = ['archives']
    pkg {
        repo = "maven"
        name = "Starry"    //发布到JCenter上的项目名字
        websiteUrl = siteUrl
        vcsUrl = gitUrl
        licenses = ["Apache-2.0"]
        publish = true
    }
}
javadoc { //jav doc采用utf-8编码否则会报“GBK的不可映射字符”错误
    options{
        encoding "UTF-8"
        charSet 'UTF-8'
    }
}
三.在local.properities中添加
bintray.user=your bintray username
bintray.apikey=your apikey
记得把local.properties加到gitignore里面,搞定
在需要使用的module的build.gradle中引入
buildscript {
    repositories {
        maven {
            url 'https://dl.bintray.com/haldir65/maven'
        }
    }
}

dependencies {
    implementation 'com.github.haldir65.starry:starry:1.0.0'
}
3. Building LifeCycle
编译的各个阶段的hook
正如gradle官网所介绍的,Build流程分为三个阶段(Initialization -> Configuration -> Execution) .
The settings file is executed during the initialization phase. 即settings.gradle中的语句是最早被执行的
setting.gradle
println ‘This is executed during the initialization phase.’
build.gradle
println 'This is executed during the configuration phase.'

task configured {
    println 'This is also executed during the configuration phase.'
}

task test {
    doLast {
        println 'This is executed during the execution phase.'
    }
}

task testBoth {
    doFirst {
      println 'This is executed first during the execution phase.'
    }
    doLast {
      println 'This is executed last during the execution phase.'
    }
    println 'This is executed during the configuration phase as well.'
}
输出
gradle test testBoth
This is executed during the initialization phase.
This is executed during the configuration phase.
This is also executed during the configuration phase.
This is executed during the configuration phase as well.
:test
This is executed during the execution phase.
:testBoth
This is executed first during the execution phase.
This is executed last during the execution phase.
BUILD SUCCESSFUL in 0s
2 actionable tasks: 2 executed
经常会在build.gradle中看到这样一段
afterEvaluate { project ->
    logger.info("=========afterEvaluate==============")
    project.tasks.each { task ->
        if (task.name == "test"||task.name.contains("lint")){
            task.enabled = false // 有些不必要的确实可以剔除掉
        }
//        task.enabled = false 这么干的话全部任务都不会执行
       println("-------------${task.name}----")
    }
}
closure就是一对花括号包着的东西
afterEvaluate发生在Configuration之后,实际上也就是在project配置完成后,开始执行所有task前,对外提供一个closure,其实beforeEvaluate也有。
immediately invoked after a task is added to a project 在Task被添加到project的时候执行closure
tasks.whenTaskAdded { task ->
    task.ext.srcDir = 'src/main/java'
}

task a

println "source dir is ${a.srcDir}"
project evaluate有可能成功,也会失败。但无论成功还是失败,下面的notification都会触发
gradle.afterProject {project, projectState ->
    if (projectState.failure) {
        println "Evaluation of $project FAILED"
    } else {
        println "Evaluation of $project succeeded"
    }
}
在gradle的plugin中实现也有类似的
PluginImpl.groovy
public class PluginImpl implements Plugin<Project> {

   void apply(Project project) {
     project.gradle.addProjectEvaluationListener() // 和在build.gradle中afterEvaluate差不多
     project.getGradle().taskGraph.addTaskExecutionGraphListener() //在执行前
   }
}
Task execution graph ready( graphPopulated,This method is called when the TaskExecutionGraph has been populated, and before any tasks are executed.)在任何task执行前被执行
Task execution(You can receive a notification immediately before and after any task is executed.)
(TaskExecutionListener,在task执行前和执行后)
project.gradle.addListener(new TaskExecutionListener() {
          @Override
          void beforeExecute(Task task) {

          }

          @Override
          void afterExecute(Task task, TaskState taskState) {

          }
      })
而在build.gradle中是这样的写法
task ok

task broken(dependsOn: ok) {
    group 'Welcome' // 这个是task的一个属性
    description 'Produces a greeting' // 这个是在project中输入gradle tasks之后输出的任务列表中每一项后面的描述信息

    doLast {
        throw new RuntimeException('broken')
    }
}

gradle.taskGraph.beforeTask { Task task ->
    println "executing $task ..."
}

gradle.taskGraph.afterTask { Task task, TaskState state ->
    if (state.failure) {
        println "FAILED"
    }
    else {
        println "done"
    }
}
4. How to create gradle Plugin
- add to your buidl script // 不可复用
- 创建BuildSrc文件夹 //依旧不可复用
- 创建一个Standalone Project //可复用
public class GreetingPlugin implements Plugin<Project> {
    @Override
    public void apply(Project project) {
        project.task("hello")
          .doLast(task -> System.out.println("Hello Gradle!"));
    }
}
使用Transform Api在class变成dex之前对class进行字节码修改
本质上是在merge{ProductFlavor}{BuildType}Assets Task之后,transformClassesWithDexFor{ProductFlavor}{BuildType} Transform 之前,插入一个transformClassesWith{YourTransformName}For{ProductFlavor}{BuildType} Transform
5. update
preBuild << {
    String cmd = "sh inrouter/maker/route.sh " + project.getName()
    def cmdResult = cmd.execute().text.trim()
    println cmdResult
}
#echo "Start make"
#javac -encoding utf-8 ./inrouter/maker/java/com/me/obo/maker/utils/*.java ./inrouter/maker/java/com/me/obo/maker/*.java -d inrouter/maker/class/  -cp inrouter/maker/libs/javapoet-1.9.0.jar
#java -Djava.ext.dirs=inrouter/maker/libs -classpath inrouter/maker/class com.me.obo.maker.CodeMaker $1 $2
#echo "End make"
Tinker的gradle plugin实现,非常有参考意义
和java libraray提交到jcenter不同,gradle需要提交到Gradle Plugin Portal。没错,一个完全不一样的网站
明明已经把所有的包都改成implementation了,编译器还是报error
./gradlew :app:dependencies –configuration compile ##这条命令可以查询当前app中还有哪条依赖在用compile
在setting.gradle中这么写也是可以的
include ‘:library1’
project(‘:library1’).projectDir = new File(‘../StickyListHeader/library1’)
buildScript中gradle library的搜索顺序。比如自己添加了一个
maven {
            url 'https://maven.google.com/'
            name 'Google'
        }
像这样的repository
信不信由你,build.gradle文件有时候是从上往下读的。
    buildTypes {
        release {
            minifyEnabled true
            proguardFiles getDefaultProguardFile('proguard-android.txt'), 'proguard-rules.pro'
            signingConfig signingConfigs.release
            shrinkResources true
        }

        debug {
            minifyEnabled false
            proguardFiles getDefaultProguardFile('proguard-android.txt'), 'proguard-rules.pro'
        }

    }

// signingConfigs写在下面是不认的,把这个signingConfigs挪到上面就行了。这跟多数语言的函数声明要写在引用前头是一样的。
    signingConfigs {
        release {
           // ...
        }
    }
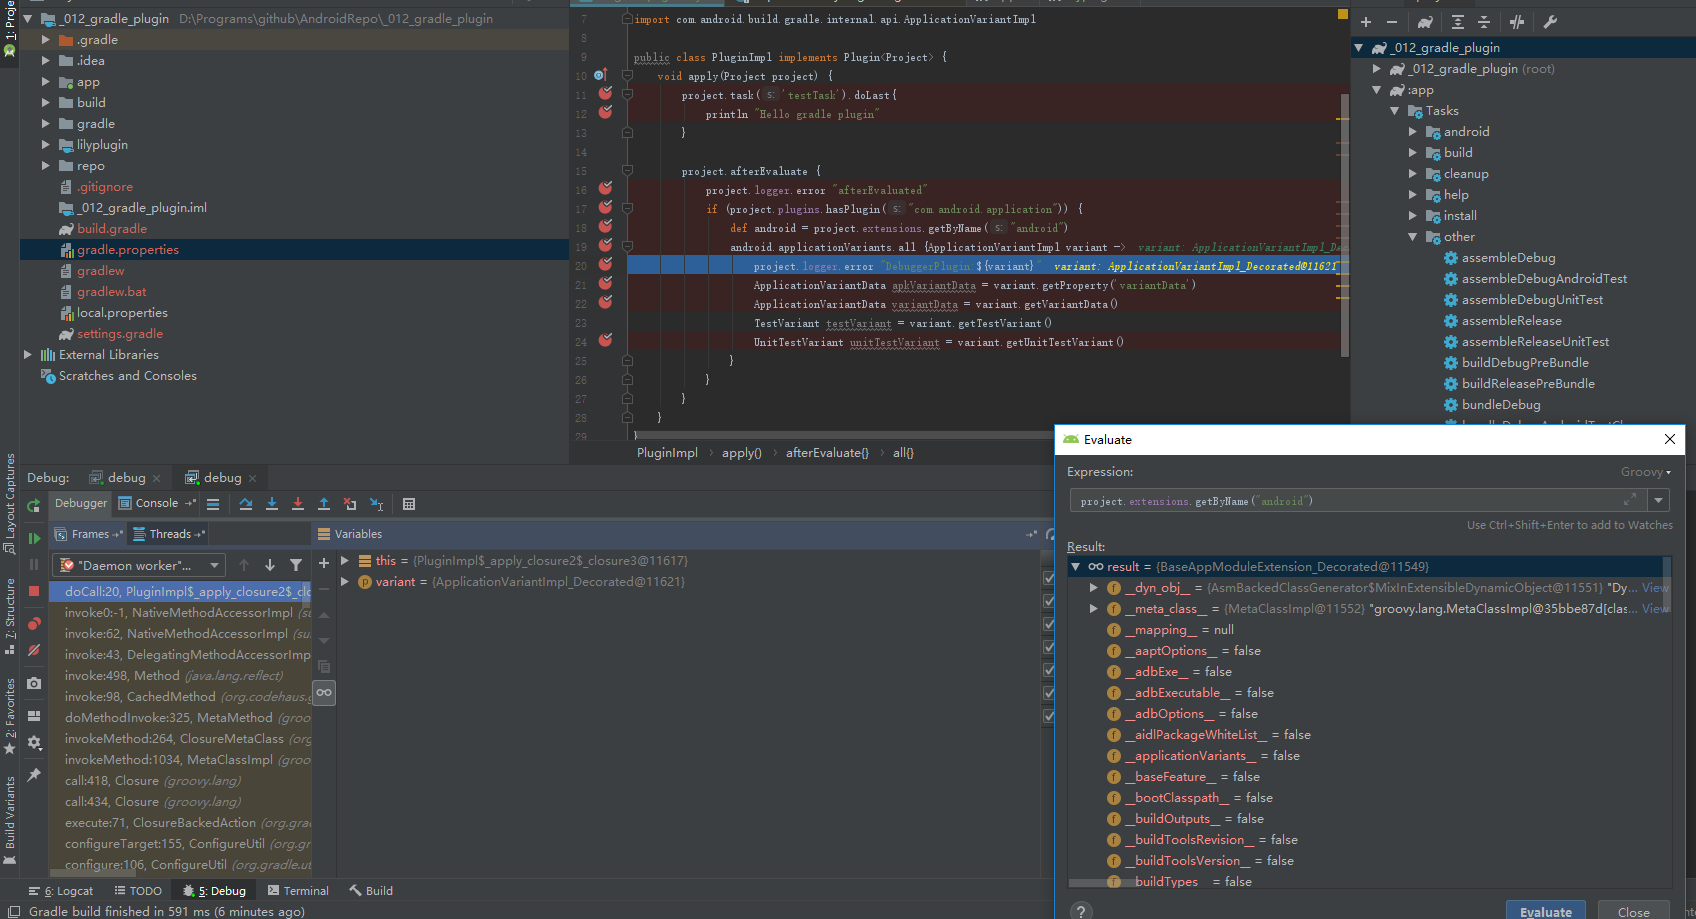
如何debug gradle plugin
在命令行里
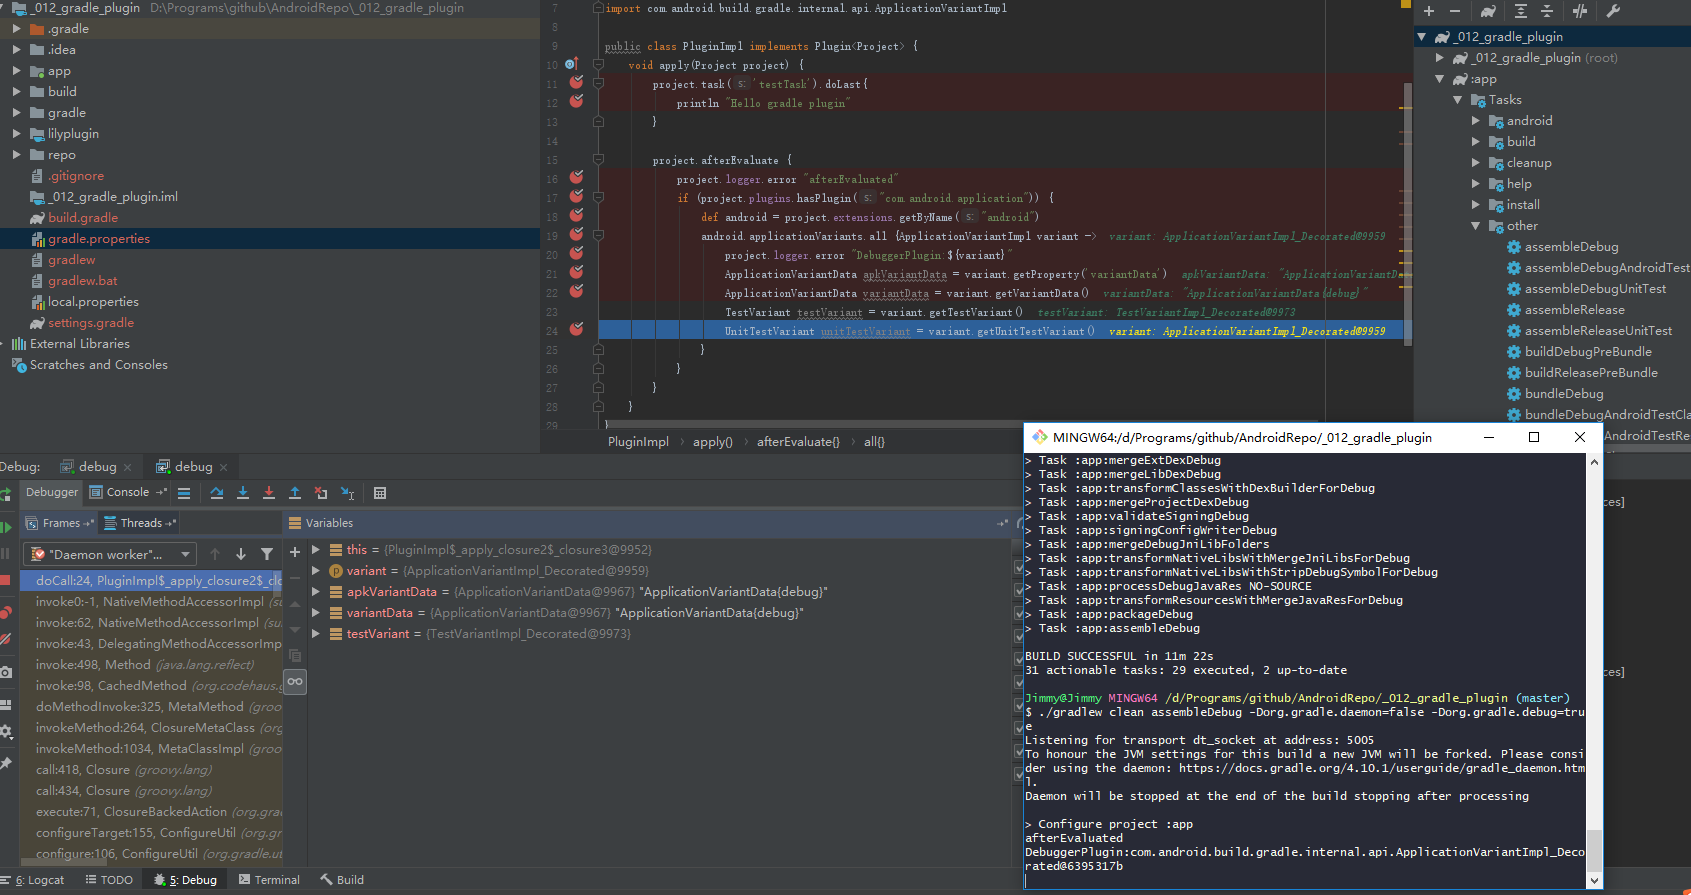
./gradlew clean assembleDebug -Dorg.gradle.daemon=false -Dorg.gradle.debug=true //一个是noDaemon 一个是debug=true (这段输入后命令行会卡在这里等debugger attach上来)
然后照着在studio里面添加一个remote debug.
然后点击这个debug按钮
Listening for transport dt_socket at address: 5005 //这个是在等着
To honour the JVM settings for this build a new JVM will be forked. Please consider using the daemon: https://docs.gradle.org/4.10.1/userguide/gradle_daemon.html. //这个是点了一次那个debug按钮
Daemon will be stopped at the end of the build stopping after processing //这个是我又点了一次之后,终于开始运行了(要点两次。。。)
效果是酱紫的

public class PluginImpl implements Plugin<Project> {
    void apply(Project project) {
        project.task('testTask').doLast{
            println "Hello gradle plugin"
        }

        project.afterEvaluate {
            project.logger.error "afterEvaluated" //这个先执行
            if (project.plugins.hasPlugin("com.android.application")) {
                def android = project.extensions.getByName("android")
                android.applicationVariants.all {ApplicationVariantImpl variant -> //这里会冒出来debug和release的两种variant,似乎android gradle plugin 在3.5的时候会设定lazyTask,就是这里只会有一个debug
                    project.logger.error "DebuggerPlugin:${variant}"
                    ApplicationVariantData apkVariantData = variant.getProperty('variantData')
                    ApplicationVariantData variantData = variant.getVariantData()
                    TestVariant testVariant = variant.getTestVariant()
                    UnitTestVariant unitTestVariant = variant.getUnitTestVariant()
                }
            }
        }
    }
}
下面这俩其实是一样的,
其实在gradle中,这是一个方法调用,它的本质是implementation()方法传入了一个map参数,因此完整的写法实际上是这样的:
implementation 'com.android.support:appcompat-v7:28.0.0'
implementation( group: 'com.android.support', name:'appcompat-v7', version:'28.0.0')
error
One of the classes is an explicit generated class using the class statement, the other is a class generated from the script body based on the file name. Solutions are to change the file name or to change the class name.
gradle的transitive 是指依赖是否会传递 默认transitive = true ,就是说会去一直下载上游依赖的库,否则就是自己去添加这些上游依赖。
参考
比较复杂的gradle knowledge
official gradle docs 是最好的学习资料
custom_plugins
Build Script Basics
关于Android Gradle你需要知道这些(4)
Gradle插件学习笔记(四)
Android Gradle Plugin source Code
gradle api挪到google()仓库了
