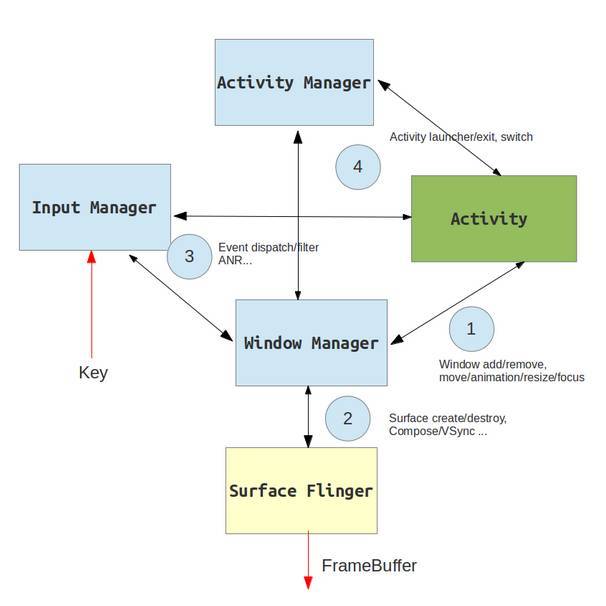
谈一谈View的渲染流程吧
Activity
不负责控制视图,它主要控制生命周期和处理事件。Activity中通过持有PhoneWindow来控制视图,而事件则是通过WindowCallback来传达给Activity的
Window(唯一实现类是PhoneWindow)。PhoneWindow是在activity的attach中new出来的,并且设置了PhoneWindow.setCallback(this)。大致代码如下
//activity.java
final void attach(Context context, ActivityThread aThread,
        Instrumentation instr, IBinder token, int ident,
        Application application, Intent intent, ActivityInfo info,
        CharSequence title, Activity parent, String id,
        NonConfigurationInstances lastNonConfigurationInstances,
        Configuration config, String referrer, IVoiceInteractor voiceInteractor,
        Window window, ActivityConfigCallback activityConfigCallback) {
    attachBaseContext(context);
    mWindow = new PhoneWindow(this, window, activityConfigCallback);//创建一个window
    mWindow.setWindowControllerCallback(this);
    mWindow.setCallback(this); //用于向activity分发点击或者状态改变事件
    mWindow.setOnWindowDismissedCallback(this);
    mWindow.setWindowManager(
    (WindowManager)context.getSystemService(Context.WINDOW_SERVICE),
    mToken, mComponent.flattenToString(),
    (info.flags & ActivityInfo.FLAG_HARDWARE_ACCELERATED) != 0);//设置windowManager对象
    }
PhoneWindow中持有了DecorView,DecorView是最顶层的视图
PhoneWindow和mContentParent
DecorView继承自FrameLayout,内部只有一个LinearLayout的child(mContentParent),这个linearLayout从上到下依次是ViewStub(actionBar),一个FrameLayout(标题栏),一个android.R.id.content的FrameLayout.
Activity的setContentView走到了PhoneWindow的setContentView中
// PhoneWindow.java
  @Override
    public void setContentView(int layoutResID) {
        installDecor();
        //有所删减
        mLayoutInflater.inflate(layoutResID, mContentParent);

    }
    private void installDecor() {
         if (mDecor == null) {
            mDecor = generateDecor(-1); //new一个DecorView出来
        }
        if (mContentParent == null) {
            mContentParent = generateLayout(mDecor); //根据不同的theme创建DecorView的child
        }
    }

    protected DecorView generateDecor(int featureId) {
        return new DecorView(context, featureId, this, getAttributes());//DecorView也就持有了window对象
    }

    protected ViewGroup generateLayout(DecorView decor) {
        // Inflate the window decor.

        int layoutResource;
        //根据不同的theme,可能出现的layoutResource有
        layoutResource = R.layout.screen_swipe_dismiss;
        layoutResource = R.layout.screen_title_icons;
        layoutResource = R.layout.screen_progress;
        layoutResource = R.layout.screen_custom_title;
        layoutResource = a.getResourceId(
                    R.styleable.Window_windowActionBarFullscreenDecorLayout,
                    R.layout.screen_action_bar);
        layoutResource = R.layout.screen_title;
        layoutResource = R.layout.screen_simple_overlay_action_mode;
        layoutResource = R.layout.screen_simple;
        //这些可能的layoutResource就是DecorView的child的布局文件
        mDecor.onResourcesLoaded(mLayoutInflater, layoutResource); //这里面直接layoutInflater这个布局文件,deocorView去add这个View
        ViewGroup contentParent = (ViewGroup)findViewById(ID_ANDROID_CONTENT);//在这个新创建的布局中找android.R.id.content

    }
    //installDecor走完这个mContentParent也就找到了

    //上面说道PhoneWindow的setContentView大致两句话,installDecor()和mLayoutInflater.inflate(layoutResID, mContentParent);
    //于是mLayoutInflater.inflate(layoutResID, mContentParent);就是把开发者写的layoutRes文件对应的view创建出来并且添加到mContentParent中
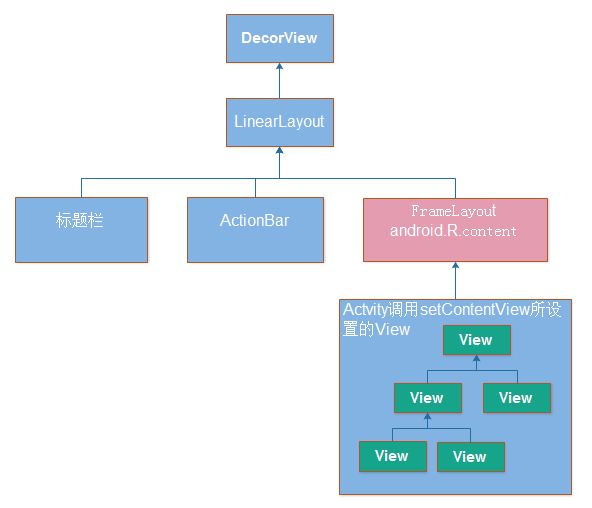
到这里我们自己写的view也就被添加到android.R.id.content这个FrameLayout里了,这时应该在onCreate里面。根据ActivityThread在6.0的代码
//ActivityThread.java
private void handleLaunchActivity(ActivityClientRecord r, Intent customIntent) {
   Activity a = performLaunchActivity(r, customIntent);
      if (a != null) {
         handleResumeActivity(r.token, false, r.isForward,!r.activity.mFinished && !r.startsNotResumed);
      }
}

final void handleResumeActivity(IBinder token,
boolean clearHide, boolean isForward, boolean reallyResume) {
      ActivityClientRecord r = performResumeActivity(token, clearHide);//这里面就是正常的onResume
      if (r.window == null && !a.mFinished && willBeVisible) {
        r.window = r.activity.getWindow();
        View decor = r.window.getDecorView();//拿到decorView
        decor.setVisibility(View.INVISIBLE);//改为不可见
        ViewManager wm = a.getWindowManager();
        WindowManager.LayoutParams l = r.window.getAttributes();
        a.mDecor = decor;
        l.type = WindowManager.LayoutParams.TYPE_BASE_APPLICATION;
        l.softInputMode |= forwardBit;
        if (a.mVisibleFromClient) {
            a.mWindowAdded = true;
            wm.addView(decor, l); //通过windowManager去addView,l是windowManager的layoutparameters,ViewRootImpl也就是从这里创建
        }
      }


    // The window is now visible if it has been added, we are not
        // simply finishing, and we are not starting another activity.
 //上面设置INVISIBLE的原因,这里也说了,如果没有finish,也没有正在起另一个activity的话,就可以让这个activity变得可见了
    if (!r.activity.mFinished && willBeVisible
            && r.activity.mDecor != null && !r.hideForNow) {
       if (r.activity.mVisibleFromClient) {
            r.activity.makeVisible();
        }
    }
}

//activity.java
void makeVisible() {
    if (!mWindowAdded) {
        ViewManager wm = getWindowManager();
        wm.addView(mDecor, getWindow().getAttributes());
        mWindowAdded = true;
    }
    mDecor.setVisibility(View.VISIBLE);//重新改成visible
}
到这里(onResume走完),DecorView就被WindowManager调用addView了。下面开始讲调用WindowManager的addView这个IPC需要准备的参数和远端如何接收这个收到的参数
WindowManagerGlobal
WindowManager是一个接口,其addView和removeView是由WindowManagerImpl去调用WindowManagerGlobal做的(设计模式:代理模式。WindowManagerGlobal是app进程中的单例)
WindowManagerGlobal和WMS交互调用的是IWindowManager在WMS中的对应实现
WindowManagerGlobal.sWindowSession是app进程中所有viewRootImpl的IWindowSession
//WindowManagerGlobal.java
 public void addView(View view, ViewGroup.LayoutParams params, Display display, Window parentWindow) {

        final WindowManager.LayoutParams wparams = (WindowManager.LayoutParams) params;
        if (parentWindow != null) {
            parentWindow.adjustLayoutParamsForSubWindow(wparams);//这里将activity的token设置到了WindowManager.layoutParams中
        }
        ViewRootImpl root;
        root = new ViewRootImpl(view.getContext(), display);
        view.setLayoutParams(wparams);
        // do this last because it fires off messages to start doing things
        try {
            root.setView(view, wparams, panelParentView);
        } catch (RuntimeException e) {
            // BadTokenException or InvalidDisplayException, clean up.
            if (index >= 0) {
                removeViewLocked(index, true);
            }
            throw e;
        }
}
到这里,我们从activity.setContentView -> 创建DecorView和DecorView的child,以及找到android.R.id.content,往里面添加自定义布局 -> handleResumeActivity(通过windowManager.addView,然后makeVisible) ,这些都是一个message中处理的。WindowManager.addView转入ViewRootImpl的setView方法,把decorView添加进去了
ViewRootImpl
//viewRootImpl.java
//首先需要声明ViewRootImpl不是View
public final class ViewRootImpl implements ViewParent,
        View.AttachInfo.Callbacks, ThreadedRenderer.DrawCallbacks {

}

public void setView(View view, WindowManager.LayoutParams attrs, View panelParentView) {
    //这里的view是DecorView
     int res; /* = WindowManagerImpl.ADD_OKAY; */

    // Schedule the first layout -before- adding to the window
    // manager, to make sure we do the relayout before receiving
    // any other events from the system.
    requestLayout();

    //和windowManagerService打交道的ipc就在这里了
    res = mWindowSession.addToDisplay(mWindow, mSeq, mWindowAttributes,
                        getHostVisibility(), mDisplay.getDisplayId(), mWinFrame,
                        mAttachInfo.mContentInsets, mAttachInfo.mStableInsets,
                        mAttachInfo.mOutsets, mAttachInfo.mDisplayCutout, mInputChannel);
    // mWindowSession是WindowManagerGlobal提供的,全局唯一的static变量
    // mWindowSession是IWindowSession对象,IWindowSession.aidl中定义了这个ipc的一系列方法
    //这个mWindow其实是ViewRootImpl.W extends IWindow.Stub,也就是WMS远程调用进入app进程中的代理

     // Set up the input pipeline.这些stage是责任链模式处理事件,每一个持有前一个的引用
    CharSequence counterSuffix = attrs.getTitle();
    mSyntheticInputStage = new SyntheticInputStage();
    InputStage viewPostImeStage = new ViewPostImeInputStage(mSyntheticInputStage); //这个是处理native层传来的inputEvent的
    InputStage nativePostImeStage = new NativePostImeInputStage(viewPostImeStage,
            "aq:native-post-ime:" + counterSuffix);
    InputStage earlyPostImeStage = new EarlyPostImeInputStage(nativePostImeStage);
    InputStage imeStage = new ImeInputStage(earlyPostImeStage,
            "aq:ime:" + counterSuffix);
    InputStage viewPreImeStage = new ViewPreImeInputStage(imeStage);
    InputStage nativePreImeStage = new NativePreImeInputStage(viewPreImeStage,
            "aq:native-pre-ime:" + counterSuffix);

    mFirstInputStage = nativePreImeStage;
    mFirstPostImeInputStage = earlyPostImeStage;
    mPendingInputEventQueueLengthCounterName = "aq:pending:" + counterSuffix;
}
下面开始关注这个ipc
IWindowSession.addToDisplay做了什么
参考《深入理解Android卷 I》- 第八章 - Surface- 读书笔记-part2
下面这些都运行在system_server进程
frameworks/base/services/core/java/com/android/server/wm/Session.java
final class Session extends IWindowSession.Stub{

    @Override
    public int addToDisplay(IWindow window, int seq, WindowManager.LayoutParams attrs,
        int viewVisibility, int displayId, Rect outContentInsets, Rect outStableInsets,
        Rect outOutsets, InputChannel outInputChannel) {
    return mService.addWindow(this, window, seq, attrs, viewVisibility, displayId,
            outContentInsets, outStableInsets, outOutsets, outInputChannel);
    }
}
frameworks/base/services/core/java/com/android/server/wm/WindowManagerService.java
WMS的成员变量包括
mSessions:ArraySet<Session> //All currently active sessions with clients.一个app只有一个session
mWindowMap:HashMap<IBinder,WindowState> // Mapping from an IWindow IBinder to the server's Window object.Key是IWindow
mTokenMap:HashMap<IBinder,WindowToken> //Mapping from a token IBinder to a WindowToken object.key应该是IApplicationToken,是从WindowManager.LayoutParams.token跨ipc传入的,value是windowToken。一个windowToken(背后对应唯一activity),下面包含多个windowState(一个activity可以有多个窗口,比如Dialog)
一个windowToken中存有多个WindowState(token.windows),而一般的,一个WindowState就对应一个window.
就像WMS要管理多个app(WindowToken),每个app有多个窗口(WindowState,在app端就是ViewRootImpl.W),
//windowManagerService.java
 public int addWindow(Session session, IWindow client, int seq,
            WindowManager.LayoutParams attrs, int viewVisibility, int displayId,
            Rect outContentInsets, Rect outStableInsets, Rect outOutsets,
            InputChannel outInputChannel) {

         if (token == null) {
             //这就是系统要求TYPE_APPLICATION类型的窗口,要求必须有activity的token,否则会抛出BadTokenException异常。Dialog的type是TYPE_APPLICATION,所以必须要在layoutParams中填上activity的token
                if (type >= FIRST_APPLICATION_WINDOW && type <= LAST_APPLICATION_WINDOW) { //1-99之间 ,TYPE_APPLICATION=2
                    Slog.w(TAG, "Attempted to add application window with unknown token "
                          + attrs.token + ".  Aborting.");
                    return WindowManagerGlobal.ADD_BAD_APP_TOKEN;
                }
            }
        // 这里包括一系列的检查
        // 1. 窗口类型必须是合法范围内的,应用窗口,子窗口,或者系统窗口
        // 2. 如果是系统窗口,需要进行权限检查。TYPE_TOAST,TYPE_WALLPAPER等不需要权限
        // 3. 如果是应用窗口,先用attrs里面的token检索出来WindowToken,必须不能为null,而且还得是Activity的mAppToken,同时该Activity还必须没有被finish。在Activity启动的时候,会先通过WMS的addAppToken方法添加一个AppWindowToken(IApplicationToken.Stub appToken)到mTokenMap中(ActivityStack.startActivityLocked),其中key就用到了IApplicationToken。而这个mAppToken就是在activity的attach方法里面赋值的,具体来自AMS.(所以就是system_server进程在启动一个activity的时候往WMS的一个map里放了一个new WindowToken对象。app进程在handleLaunchActivity的时候会拿到这个appToken,于是app进程拿着这个mAppToken通过ipc到WMS中去问,有没有这个mAppToken存过东西)
        WindowState win = new WindowState(this, session, client, token,  attachedWindow, appOp[0], seq, attrs, viewVisibility, displayContent);
            //后续会将这个WindowState添加到WMS的成员中, token.windows.add(i, win);

        // ...
        // tokenMap里面没有找到
        token = new WindowToken(this, attrs.token, -1, false);
        //attrs就是layoutParams.token就通过binder call传入wms进程,所以token就是activity的token,token是绑定在window上,也就是一个activity有一个
        // ..
        if (addToken) {
            mTokenMap.put(attrs.token, token);//mTokenMap保存所有的WindowToken对象,key是
        }
        win.attach(); //将session添加到mSessions中
        mWindowMap.put(client.asBinder(), win);//这个client是IWindow,其实就是ViewRootImpl.W类对象为key,windowState作为value。这不就是一个ViewRootImpl对应一个WindowState嘛

}

// WindowState.java
void attach() {
    if (WindowManagerService.localLOGV) Slog.v(
        TAG, "Attaching " + this + " token=" + mToken
        + ", list=" + mToken.windows);
    mSession.windowAddedLocked();
}

//Session.java
void windowAddedLocked() {
        if (mSurfaceSession == null) {
            mSurfaceSession = new SurfaceSession();
            mService.mSessions.add(this);// windowState.attach -> Session.windowAddedLocked -> WMS.msession.add(session)
        }
        mNumWindow++;
    }
// windowToken.java
//windowToken似乎有用的方法就这么一个,也说明一个windowToken实际上有多个Window
 void removeAllWindows() {
        for (int winNdx = windows.size() - 1; winNdx >= 0; --winNdx) {
            WindowState win = windows.get(winNdx);
            if (WindowManagerService.DEBUG_WINDOW_MOVEMENT) Slog.w(WindowManagerService.TAG,
                    "removeAllWindows: removing win=" + win);
            win.mService.removeWindowLocked(win);
        }
        windows.clear();
    }
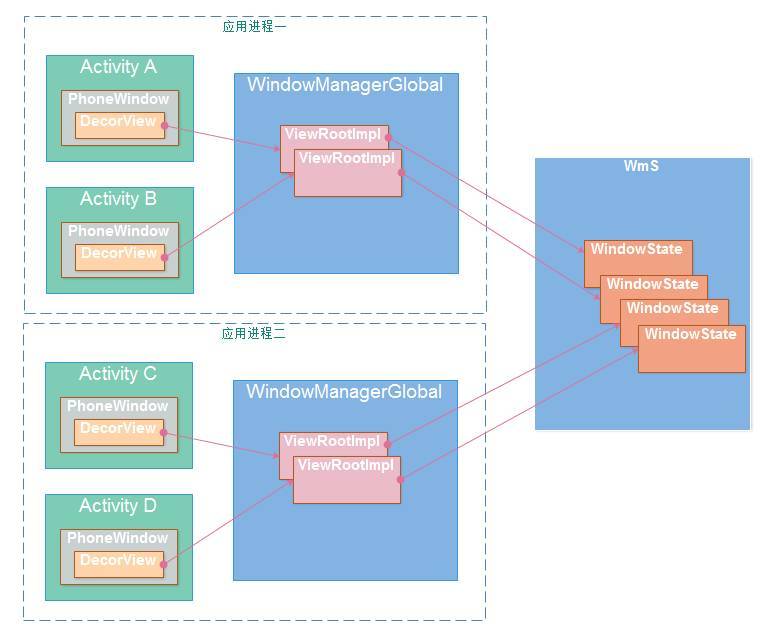
一般的,每一个window都对应一个WindowState对象,
该对象的成员中mClient(final IWindow mClient;)用于跟应用端交互
成员变量mToken(WindowToken mToken;)用于跟AMS交互
ViewRootImpl中有针对远程返回的res判断的逻辑,结合这WindowManagerService的addView方法查看更加清楚
//ViewRootImpl.java
 switch (res) {
                case WindowManagerGlobal.ADD_BAD_APP_TOKEN:
                case WindowManagerGlobal.ADD_BAD_SUBWINDOW_TOKEN:
                    throw new WindowManager.BadTokenException(
                            "Unable to add window -- token " + attrs.token
                            + " is not valid; is your activity running?");
                case WindowManagerGlobal.ADD_NOT_APP_TOKEN:
                    throw new WindowManager.BadTokenException(
                            "Unable to add window -- token " + attrs.token
                            + " is not for an application");
                case WindowManagerGlobal.ADD_APP_EXITING:
                    throw new WindowManager.BadTokenException(
                            "Unable to add window -- app for token " + attrs.token
                            + " is exiting");
}

//windowManagerService.java
 public int addWindow(Session session, IWindow client,xxx) {
     //从一个HashMap<IBinder,WindowToken>中去get(LayoutParams.attr.token)
  WindowToken token = displayContent.getWindowToken(
                    hasParent ? parentWindow.mAttrs.token : attrs.token);
  //如果发现没有windowToken(一个WindowToken有多个windowState,也就是有多个window),开始报错
   if (token == null) {
        if (rootType >= FIRST_APPLICATION_WINDOW && rootType <= LAST_APPLICATION_WINDOW) { // 1-99之间,多数是这里
            Slog.w(TAG_WM, "Attempted to add application window with unknown token "
                    + attrs.token + ".  Aborting.");
            return WindowManagerGlobal.ADD_BAD_APP_TOKEN; // 这里回到app进程就抛is your activity running?
        }
    }else {
            // ..省略....
         if (atoken == null) {
                Slog.w(TAG_WM, "Attempted to add window with non-application token "
                        + token + ".  Aborting.");
                return WindowManagerGlobal.ADD_NOT_APP_TOKEN;
            } else if (atoken.removed) {
                Slog.w(TAG_WM, "Attempted to add window with exiting application token "
                        + token + ".  Aborting.");
                return WindowManagerGlobal.ADD_APP_EXITING;
                //这里抛出什么错,在ViewRootImpl里面就有对应的解释
    }
}
添加View到WMS的流程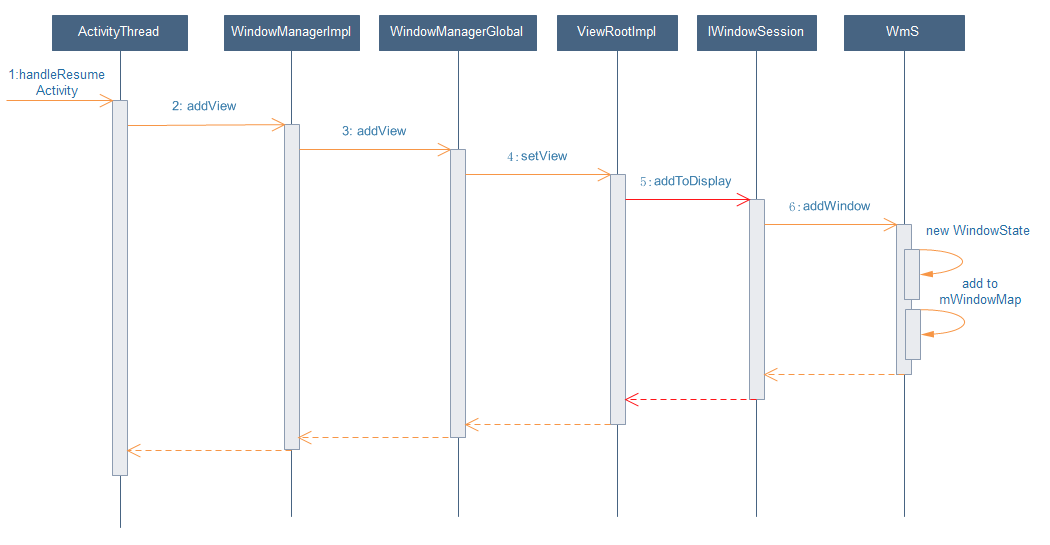
从WMS中RemoveView的流程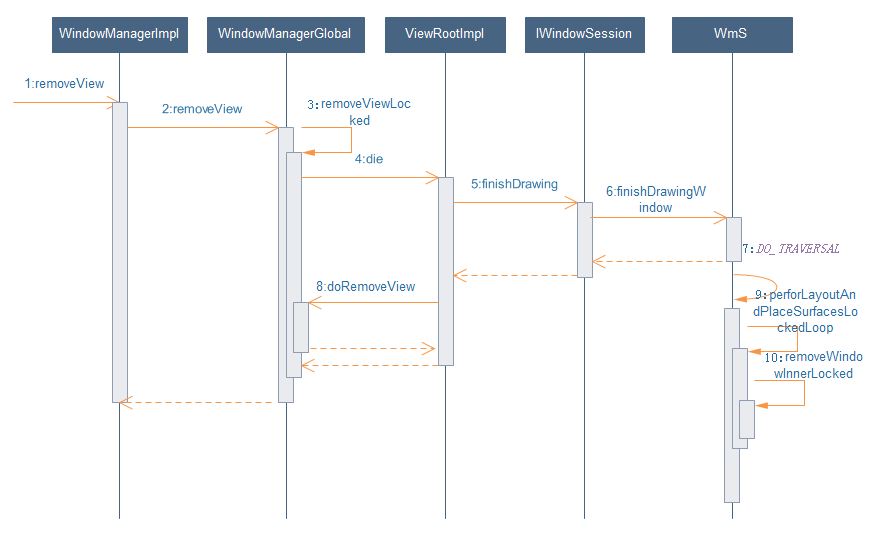
回到ViewRootImpl的setView方法,session.addToDisplay
//ViewRootImpl.java
res = mWindowSession.addToDisplay(mWindow, mSeq, mWindowAttributes,
                    getHostVisibility(), mDisplay.getDisplayId(), mWinFrame,
                    mAttachInfo.mContentInsets, mAttachInfo.mStableInsets,
                    mAttachInfo.mOutsets, mAttachInfo.mDisplayCutout, mInputChannel);

//app端到服务端
//调用服务端通过IWindowSession,
// IWindowSession在server端的实现是Session
final IWindowSession mWindowSession;

final class Session extends IWindowSession.Stub{
    //运行在system_server进程,是system_server的binder服务端
}

//服务端到app端
//控制app端通过IWindow,app端提供的实现就是W。
final W mWindow;

static class W extends IWindow.Stub{
    //运行在app进程,是app端的ViewRootImpl.W服务的binder代理对象
    //这个W的构造函数把ViewRootImpl用weakReference包起来了,远程有消息到达的时候就去调用viewRootImpl的对应方法
}
app端通过IWindowSession调用WMS端的方法,WMS端通过IWindow(WindowState.mClient)调用app端的方法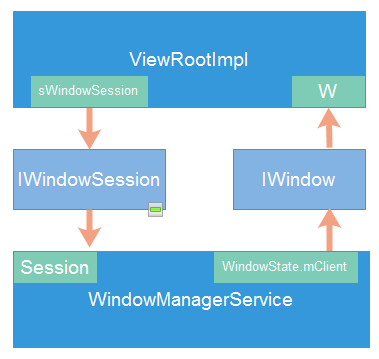
Window调用过程中涉及到的IPC服务
| Binder服务端 | 接口 | 所在进程 |
|---|---|---|
| WindowManagerService | IWindowManager | system_server |
| Session | IWindowSession | system_server |
| ViewRootImpl.W | IWindow | app进程 |
| ActivityRecord.Token | IApplicationToken | system_server |
ActivityRecord.Token:StartActivity通过binder call进入systemServer进程,在AMS中创建相应的ActivityRecord.Token的成员变量appToken,然后将该对象传递到ActivityThread.
Token这个东西在几处出现了,
Activity(performLaunchActivity中的attach赋值,对应AMS中的ActivityRecord)
Window(attach方法里的PhoneWindow.setWindowManager去赋值)
WindowManager.LayoutParams.token(用于IPC)
ViewRootImpl, View, View.AttachInfo(都是在dispatchAttachToWindow的时候去设置到attachInfo的)。所以任意的View只要被添加了,那么就会有attachInfo,也就有了token(attachInfo里的token都是ViewRootImpl给的,也就是ViewRootImpl.W这个class的实例)
ViewRootImpl的traversal
上面才讲到handleResumeActivity之后创建了一个ViewRootImpl
根据6.0的代码
//ActivityThread.java
 public void handleResumeActivity(IBinder token, boolean finalStateRequest, boolean isForward,
            String reason) {
      if (r.window == null && !a.mFinished && willBeVisible) {
                r.window = r.activity.getWindow();//这些东西都是在onCreate里面去创建出来的
                View decor = r.window.getDecorView();
                decor.setVisibility(View.INVISIBLE);
                ViewManager wm = a.getWindowManager();
                WindowManager.LayoutParams l = r.window.getAttributes();
                a.mDecor = decor;
                l.type = WindowManager.LayoutParams.TYPE_BASE_APPLICATION;
                l.softInputMode |= forwardBit;
                if (a.mVisibleFromClient) {
                    a.mWindowAdded = true;
                    wm.addView(decor, l);//这里走进WindowManagerGlobal.addView
                }

            // If the window has already been added, but during resume
            // we started another activity, then don't yet make the
            // window visible.
            } else if (!willBeVisible) {
                if (localLOGV) Slog.v(
                    TAG, "Launch " + r + " mStartedActivity set");
                r.hideForNow = true;
            }
 }
}
好像还没有scheduleTraversal呢。接着看,在WindowManagerGlobal的addView里面创建了ViewRootImpl,后者在setView的时候:
//WindowManagerGlobal.java
root = new ViewRootImpl(view.getContext(), display);
view.setLayoutParams(wparams);//这里面直接一个requestLayout

//ViewRootImpl.java
// Schedule the first layout -before- adding to the window
public void setView(View view, WindowManager.LayoutParams attrs, View panelParentView) {
       // Schedule the first layout -before- adding to the window
    // manager, to make sure we do the relayout before receiving
    // any other events from the system.
    requestLayout(); //这里又进行了一次requestLayout
    //这后面才是去ipc
    res = mWindowSession.addToDisplay(mWindow, mSeq, mWindowAttributes,
        getHostVisibility(), mDisplay.getDisplayId(), mWinFrame,
        mAttachInfo.mContentInsets, mAttachInfo.mStableInsets,
        mAttachInfo.mOutsets, mAttachInfo.mDisplayCutout, mInputChannel);

}

//来看看ViewRootImpl的requestLayout,这个方法是ViewParent接口的
@Override
public void requestLayout() {
    if (!mHandlingLayoutInLayoutRequest) {
        checkThread();
        mLayoutRequested = true;
        scheduleTraversals();//直接scheduleTraversal了
    }
}
scheduleTraversals里面就是
//ViewRootImpl.java
void scheduleTraversals() {
    if (!mTraversalScheduled) {
        mTraversalScheduled = true;
        mTraversalBarrier = mHandler.getLooper().getQueue().postSyncBarrier();//PostSyncBarrier,这之后只有异步消息才能通过!
        mChoreographer.postCallback(
                Choreographer.CALLBACK_TRAVERSAL, mTraversalRunnable, null); // mDisplayEventReceiver.scheduleVsync();请求硬件系统VSync信号
    }
}
接下来就是mDisplayEventReceiver.onVsync的时候去doFrame
//Choreographer.java
 try {
        Trace.traceBegin(Trace.TRACE_TAG_VIEW, "Choreographer#doFrame");
        AnimationUtils.lockAnimationClock(frameTimeNanos / TimeUtils.NANOS_PER_MS);

        mFrameInfo.markInputHandlingStart();
        doCallbacks(Choreographer.CALLBACK_INPUT, frameTimeNanos); //最先处理INPUT

        mFrameInfo.markAnimationsStart();
        doCallbacks(Choreographer.CALLBACK_ANIMATION, frameTimeNanos);//随后是animation

        mFrameInfo.markPerformTraversalsStart();
        doCallbacks(Choreographer.CALLBACK_TRAVERSAL, frameTimeNanos);//第三个是ViewRootImpl.doTraversal,在这里ViewRootImpl会解除postSyncBarrier

        doCallbacks(Choreographer.CALLBACK_COMMIT, frameTimeNanos);
    } finally {
        AnimationUtils.unlockAnimationClock();
        Trace.traceEnd(Trace.TRACE_TAG_VIEW);
    }
这样看来,在第一次handleResumeActivity的时候,Choreographer会主动设定一次traversal,后续的measure,layout,draw也就顺理成章了
Dialog(创建了一个window)
子窗口的话,典型的例子是dialog。直接使用Activity的windowManager和WMS交互
Dialog的构造函数中
//Dialog.java
 Dialog(@NonNull Context context, @StyleRes int themeResId, boolean createContextThemeWrapper) {
    mWindowManager = (WindowManager) context.getSystemService(Context.WINDOW_SERVICE);
    // 此时拿到的是Activity的windowManager

    final Window w = new PhoneWindow(mContext);
    mWindow = w;
    w.setCallback(this);
    w.setWindowManager(mWindowManager, null, null);//这一段是为这个new出来的PhoneWindow设置一个windownManager。
    //也就是说Dialog的显示其实是使用了Activity的windowManager去调用WMS的服务的,而Dialog自身的window由于没有token,所以这个window并不能用于和WMS交互。更多的是用于持有DecorView(新的window的DecorView),等到iput事件来到时,会通过ViewRootImpl传递到DecorView(新的window的DecorView),DecorView再交给WindowCallback.
 }

 //Activity.java
 void attach(){
      mWindow.setWindowManager(
                (WindowManager)context.getSystemService(Context.WINDOW_SERVICE),
                mToken, mComponent.flattenToString(),
                (info.flags & ActivityInfo.FLAG_HARDWARE_ACCELERATED) != 0);
 }

 //Activity.java
  @Override
    public Object getSystemService(@ServiceName @NonNull String name) {
        if (WINDOW_SERVICE.equals(name)) {
            return mWindowManager; //..Activity直接在这里让Dialog获取到自己的windowManager(其对应的window已经填充好mAppToken了)
        }
        return super.getSystemService(name);
    }
如果没有token的话,ViewRootImpl.setView方法会在远程失败。在Dialog.show中调用了mWindowManager.addView(mDecor, l);这个mWindowManager其实已经是Activity的mWindowManager了。所以对这个mWindowManager(内部用mParentWindow,即Activity的window)调用addView方法。在WindowManagerGlobal的addView中有adjustLayoutParamsForSubWindow这个方法,这里最重要的就是给WindowManager.LayoutParams.token赋值。
mWindowManager.addView(mDecor, l); -> WindowManagerGlobal.addView -> Window.adjustLayoutParamsForSubWindow(就是在这里从Activity的window中取出token赋值给layoutParams的)
WindowManager.LayoutParams中有三种窗口类型type
- 应用程序窗口:FIRST_APPLICATION_WINDOW - LAST_APPLICATION_WINDOW (1-99)。 Activity的window,Dialog的window
- 子窗口: FIRST_SUB_WINDOW - LAST_SUB_WINDOW (1000-1999). 例如PopupWindow,ContextMenu,optionMenu。子窗口必须要有一个父窗口,父窗口可以是应用程序窗口,也可以是其他任意类型。父窗口的不可见时,子窗口不可见
- 系统窗口: FIRST_SYSTEM_WINDOW - LAST_SYSTEM_WINDOW (2000 -2999) Toast,输入法等等。系统窗口不需要对应Activity,比如TYPE_SYSTEM_ALERT,状态栏,来电显示,屏保等
// Window.java 当前实例是Activity的PhoneWindow,其成员变量mAppToken在activity的attach中就初始化了,debug发现是BinderProxy实例
void adjustLayoutParamsForSubWindow(WindowManager.LayoutParams wp) {
     if (wp.type >= WindowManager.LayoutParams.FIRST_SUB_WINDOW &&
                wp.type <= WindowManager.LayoutParams.LAST_SUB_WINDOW) {
            //1000-1999 //
            if (wp.token == null) {
                View decor = peekDecorView();
                if (decor != null) {
                    wp.token = decor.getWindowToken();//从mAttachInfo.mWindowToken获取
                }
            }
        } else if (wp.type >= WindowManager.LayoutParams.FIRST_SYSTEM_WINDOW &&
                wp.type <= WindowManager.LayoutParams.LAST_SYSTEM_WINDOW) {
            //系统window 2000-2999
        } else {
            //dialog的type因为是2,所以走到这里
            if (wp.token == null) {
                wp.token = mContainer == null ? mAppToken : mContainer.mAppToken;//Dialog会走到这里,mAppToken不为null
            }
        }
}
PopupWindow(没有创建window)
//popupwindow的LayoutParams.type默认是
private int mWindowLayoutType = WindowManager.LayoutParams.TYPE_APPLICATION_PANEL;// 1000
//可以修改的

//PopupWindow.java
public void showAsDropDown(View anchor, int xoff, int yoff, int gravity) {
     final WindowManager.LayoutParams p =
                createPopupLayoutParams(anchor.getApplicationWindowToken());
}

public void showAtLocation(View parent, int gravity, int x, int y) {
    mParentRootView = new WeakReference<>(parent.getRootView());
    showAtLocation(parent.getWindowToken(), gravity, x, y);
}
可以发现无论是showAsDropDown还是showAtLocation全都是需要从anchorView拿到windowToken的
  private void invokePopup(WindowManager.LayoutParams p) {
        mWindowManager.addView(decorView, p); //这时候的p已经填充了token
    }
Toast
用IPC往NotificationManagerService的一个队列中添加一个runnable,系统全局所有应用的Toast请求都被添加到这里,排队,一个个来,远程再回调app进程的Toast.TN(extends ITransientNotification.Stub)的handleShow方法去添加一个type为WindowManager.LayoutPrams.TYPE_TOAST的view。
当然,时间到了远程还会回调cancelToast去用WMS移除View。
doTraversal
ViewRootImpl中的doTraversal可以分成三件事
mView.performMeasure
mView.performLayout
mView.performDraw
这里的mView也就是DecorView了
measure
//onMeasure里的两个参数witdthMeasureSpec和heightMeasureSpec是怎么来的
  @Override
    protected void onMeasure(int widthMeasureSpec, int heightMeasureSpec) {

    }

//ViewGroup.java中有这么一段
protected void measureChildWithMargins(View child,
        int parentWidthMeasureSpec, int widthUsed,
        int parentHeightMeasureSpec, int heightUsed) {
    final MarginLayoutParams lp = (MarginLayoutParams) child.getLayoutParams();

    final int childWidthMeasureSpec = getChildMeasureSpec(parentWidthMeasureSpec,
            mPaddingLeft + mPaddingRight + lp.leftMargin + lp.rightMargin
                    + widthUsed, lp.width);
    final int childHeightMeasureSpec = getChildMeasureSpec(parentHeightMeasureSpec,
            mPaddingTop + mPaddingBottom + lp.topMargin + lp.bottomMargin
                    + heightUsed, lp.height);

    child.measure(childWidthMeasureSpec, childHeightMeasureSpec);
}

//ViewGroup.java
public static int getChildMeasureSpec(int spec, int padding, int childDimension) { //这个childDimension就是lp.width或者lp.height
    int specMode = MeasureSpec.getMode(spec);
    int specSize = MeasureSpec.getSize(spec);

    int size = Math.max(0, specSize - padding);
    //所以这个size就是当前这个viewGroup的measureSpec中的size-viewgroup的padding-child.lp.margin之后的值

    int resultSize = 0;
    int resultMode = 0;

    switch (specMode) {
    // Parent has imposed an exact size on us
    case MeasureSpec.EXACTLY:
        if (childDimension >= 0) { //如果自己是EXACTLY,child的lp.width或者lp.height>0的话,生成一个size为dimension只,mode为EXACTLY的 spec
            resultSize = childDimension;
            resultMode = MeasureSpec.EXACTLY;
        } else if (childDimension == LayoutParams.MATCH_PARENT) {
            // Child wants to be our size. So be it.
            resultSize = size;
            resultMode = MeasureSpec.EXACTLY;
        } else if (childDimension == LayoutParams.WRAP_CONTENT) {
            // Child wants to determine its own size. It can't be
            // bigger than us.
            resultSize = size;
            resultMode = MeasureSpec.AT_MOST;
        }
        break;

    // Parent has imposed a maximum size on us
    case MeasureSpec.AT_MOST:
        if (childDimension >= 0) {
            // Child wants a specific size... so be it
            resultSize = childDimension;
            resultMode = MeasureSpec.EXACTLY;
        } else if (childDimension == LayoutParams.MATCH_PARENT) {
            // Child wants to be our size, but our size is not fixed.
            // Constrain child to not be bigger than us.
            resultSize = size;
            resultMode = MeasureSpec.AT_MOST;
        } else if (childDimension == LayoutParams.WRAP_CONTENT) {
            // Child wants to determine its own size. It can't be
            // bigger than us.
            resultSize = size;
            resultMode = MeasureSpec.AT_MOST;
        }
        break;
    return MeasureSpec.makeMeasureSpec(resultSize, resultMode);
}
layout
这里就是调用onLayout方法了,FrameLayout会根据child的Gravity横向或者纵向摆放。LinearLayout会根据自己的orientation,从上到下或者从左到右进行摆放。
draw
public void draw(Canvas canvas) {
  . . .
  // 绘制背景,只有dirtyOpaque为false时才进行绘制,下同
  int saveCount;
  if (!dirtyOpaque) {
    drawBackground(canvas);
  }

  . . .

  // 绘制自身内容
  if (!dirtyOpaque) onDraw(canvas);

  // 绘制子View
  dispatchDraw(canvas);

   . . .
  // 绘制滚动条等
  onDrawForeground(canvas);

}
draw的基本流程是这样,这个canvas是ViewRootImpl中的canvas = mSurface.lockCanvas(dirty);获得的。个人理解Canvas是存储了一系列的指令,再交给surface
Choregrapher
Choregrapher里面有一个内部类FrameDisplayEventReceiver(继承自DisplayEventReceiver,DisplayEventReceiver是一个没有抽象方法的抽象类),主要提供两个方法nativeScheduleVsync和onVsync。
FrameDisplayEventReceiver在onVsync的时候会post一个异步(也就是说不受syncBarrier阻拦)的消息到主线程上去调用Choregrapher的doFrame(这里面就是把之前所有通过Choregrapher.postCallback添加到队列的事件拿出来,到期了就执行)
主线程的MessageQueue被syncBarrier堵住的显著特征是msg.target==null(也就是对应的handler为null). ViewRootImpl在scheduleTraversals的时候会postSyncBarrier一次,也就是说,这个doTraversal是高优先级的,这一刻起后面的所有丢到主线程上的msg都要等到我doTraversal完成后才执行(异步消息例外,所以上面onVsync的消息得是异步的)。从时间顺序上来讲,
ViewRootImpl.scheduleTraversal -> mChoreographer.postCallback -> Choreographer开始scheduleFrameLocked(假如时间到了,直接调用nativeScheduleVsync,否则发送的msg全都是异步的,就是为了跨过之前的barrier.)同样,在onVsync的时候,由于此时的barrier还没移除,所以发出的消息还得是异步的。doFrame里面,严格按照input -> animation -> traversal的类型去执行。也就是viewRootImpl在scheduleTraversals的时候post的callback要老老实实在第三组被执行。而在轮到这个doTraversal执行的时候,终于可以去移除barrier了。
需要指明的是,每一次scheduleTraversal都要触发measure -> layout -> draw这一套,所以,耗时是很严重的。vsync信号也不是系统主动发出的,而是需要通过nativeScheduleVsync请求,才会有一次onVsync的相应的。看了一下,ViewRootImpl里面的setLayoutParams,invalidate,requestLayout,requestFitSystemWindows等方法里面都会触发scheduleTraversal。 显然在onCreate的setContentView里面会至少调用一次。然后就是熟悉的performTraversal(measure,layout,draw)。
人们常说在onCreate里面获取一个View的宽高有四种方式:
onPreDraw,onLayoutChange,view.measure.
第四种就是直接在setContentView后面跟着post一个msg,原理就是前面有一个barrier,这个barrier解除之后执行的第一个msg大概率就是这个msg(不考虑别的线程这么巧也插进来),这时候,performTraversals刚刚走完,draw也走完了,最后绘制数据都缓存到Surface上。但是systemServer那边,windowManagerService和surfaceFlinger那边还没来得及处理这些刚draw的数据(surfaceFlinger那边还要compose,没那么快吧)。
surfaceFlinger
Android是通过系统级进程中的SurfaceFlinger服务来把真正需要显示的数据渲染到屏幕上。SurfaceFlinger的主要工作是: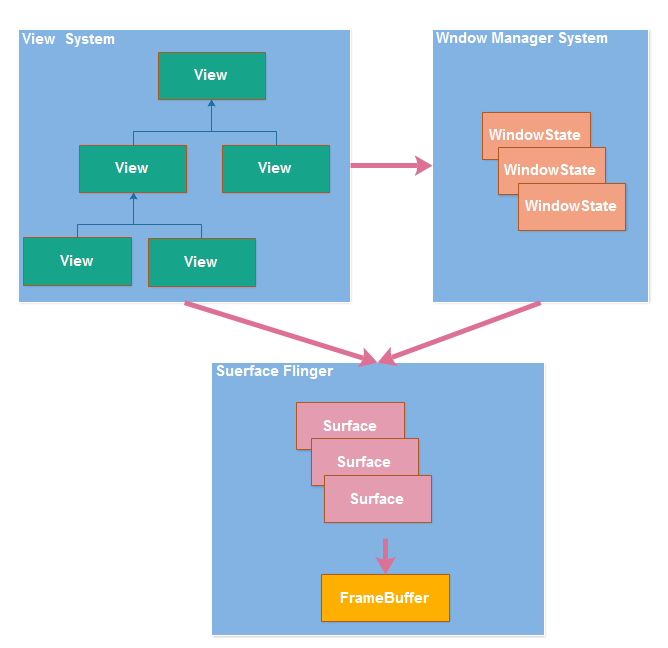
响应客户端事件,创建Layer与客户端的Surface建立连接。
接收客户端数据及属性,修改Layer属性,如尺寸、颜色、透明度等。
将创建的Layer内容刷新到屏幕上。
维持Layer的序列,并对Layer最终输出做出裁剪计算。
因应用层和系统层分别是两个不同进程,需要一个跨进程的通信机制来实现数据传输,在Android的显示系统中,使用了Android的匿名共享内存:SharedClient。每一个应用和SurfaceFlinger之间都会创建一个SharedClient,每个SharedClient中,最多可以创建31个SharedBufferStack,每个Surface都对应一个SharedBufferStack,也就是一个window。这意味着一个Android应用程序最多可以包含31个窗口,同时每个SharedBufferStack中又包含两个(<4.1)或三个(>=4.1)缓冲区。
应用层绘制到缓冲区,SurfaceFlinger把缓存区数据渲染到屏幕,两个进程之间使用Android的匿名共享内存SharedClient缓存需要显示的数据。
WMS跟surfaceFlinger交互的过程是,WMS建立SurfaceComposerClient,然后会在SF中创建Client与之对应,后续通过ISurfaceComposerClient与SF通信
APP可以没有Activty,PhoneWindow,DecorView,例如带悬浮窗的service。
